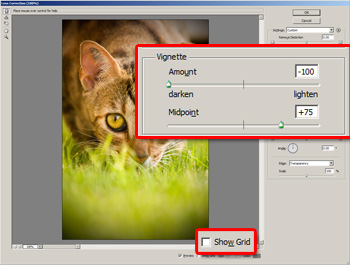
Lomo photos have a strong and noticable vignette. We'll start off by adding a strong vignette to the photo.
- Open a photo to edit.
 Image from iStockPhoto
- Follow the steps below according to the version of Photoshop you're using:
- For Photoshop CS2:
- Choose Filter> Distort> Lens Correction.
- Inside the Lens Correction filter, adjust the settings in the Vignette section to create the vignette.
 Adding a vignette with the Lens Correction filter in Adobe Photoshop CS2.
 - For Photoshop CS or older:
- Create a new layer and select the new layer.
- Use the Lasso tool and create an oval selection. It doesn't have to be perfect.
- Inverse the selection (Select> Inverse or Shift+Ctrl+I).
- Press Shift+Backspace to open the Fill tool. In the Fill tool, set the contents to Black and click OK.
- Deselect (Select> Deselect or Ctrl+D).
- Open the Gaussian Blur filter tool (Filter> Blur> Gaussian Blur). In the Gaussian Blur window, ensure that the Preview checkbox is checked and adjust the Radius to blur the edges so that a vignette is created.
- Reduce the opacity a little. An opacity around 75% should produce good results.
Adjusting the Color
Now we'll change the colors to match those produced by lomo cameras. We won't be using any color adjustment tools. Instead, we'll be modifying individual channels.
- Inside the Channels pallet (Window> Channels), select the red channel.
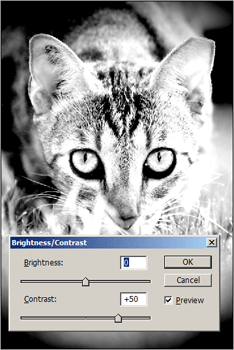
 Adjusting the contrast of the red channel using the Brightness/Contrast tool.
 - With the red channel selected, use the Brightness/Contrast tool (Image> Adjustments> Brightness/Contrast) and increase the contrast. The higher you set the contrast, the stronger the color effect will be. I found that increasing the contrast by 50 produced the most realistic results.
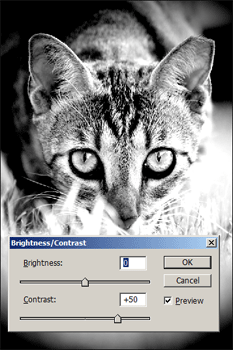
 Adjusting the contrast of the green channel using the Brightness/Contrast tool.
- Now select the green channel and use the Brightness/Contrast tool (Image> Adjustments> Brightness/Contrast) to increase the contrast by the same amount you did in the previous step.
- Select back the RGB channel (Ctrl+~) to view the final results.
Final Results

Final results
(Rollover your cursor over the above image to see the unedited image.)
(Rollover your cursor over the above image to see the unedited image.)

Final results
(Rollover your cursor over the above image to see the unedited image.)
(Rollover your cursor over the above image to see the unedited image.)

Final results
(Rollover your cursor over the above image to see the unedited image.)
(Rollover your cursor over the above image to see the unedited image.)
 Final results
(Rollover your cursor over the above image to see the unedited image.)
(By internet)
No comments:
Post a Comment