Tuesday, October 20, 2009

Photoshop Text Outline Effects

Photoshop Text Outline Effects

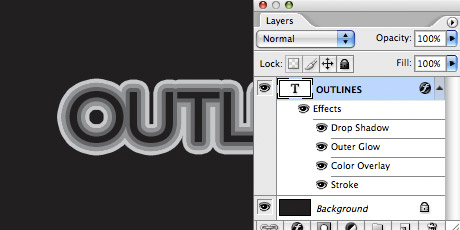
Need quick layer style that lets you apply multiple strokes (outlines) to a text or shape within Photoshop. Even though this is really simple in Illustrator via the Appearance Palette it’s not so straight forward in Photoshop (at least to my knowledge). This tutorial shows you how to hack a few of the built-in layer styles to add extra strokes outside of the actual stroke style.
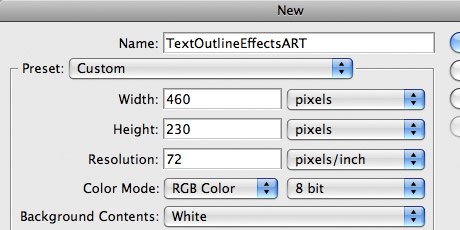
Step 1: Create a new Photoshop document.
Step 1
Step 1
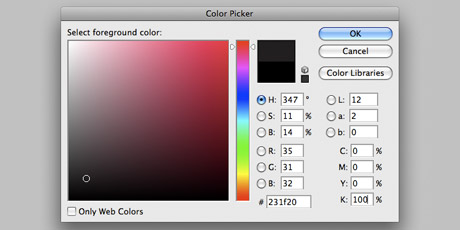
Step 2: Fill the Background layer with medium black (R 35, G 31, B 32). Edit > Fill.
Step 2
Step 2
Step 3: Add some white text to your document.
Step 3
Step 3
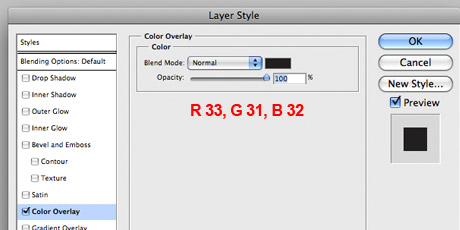
Step 4: Add a Color Overlay style to your text layer. Set the Color Overlay fill to the same medium black as the Background layer (R 35, G 31, B 32). Don’t close the Layer Style dialog box just yet and make sure to check the Preview setting so that you can see your changes.
Step 4
Step 4
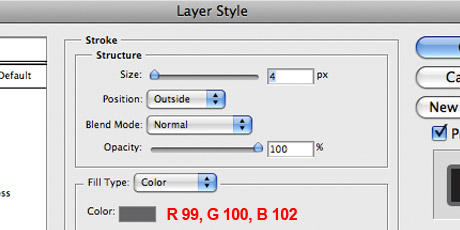
Step 5: Add a Stroke style to your text layer by clicking the small check box beside “Stroke”. Set the size of the stroke to 4 px and the color to dark gray (R 99, G 100, B 102). That’s one basic stroke!
Step 5
Step 5
Outline #1
Outline #1
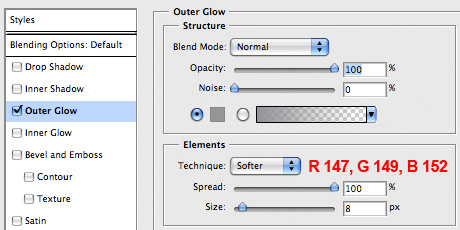
Step 6: Now add the style Outer Glow to your text layer. Set the blend mode to normal, the opacity to 100%, the color to medium gray (R 147, G 149, B 152), the spread to 100%, and the size to 8 px. That’s two strokes!
Step 6
Step 6
Outline #2
Outline #2
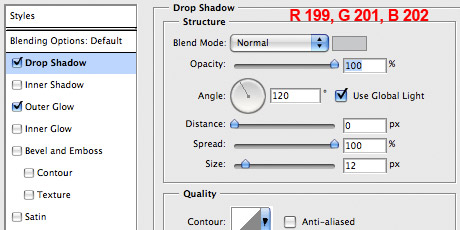
Step 7: Finally, add the Drop Shadow style to your text layer. Set the blend mode to normal, the opacity to 100%, the distance to 0 px, the spread to 100%, and the size to 12 px. That’s three strokes all in one layer style which means you can change the font and size live, and even apply the layer style to any shape or line.
Step 7
Step 7
Outline #3
Outline #3
Done: Download sample file(s).
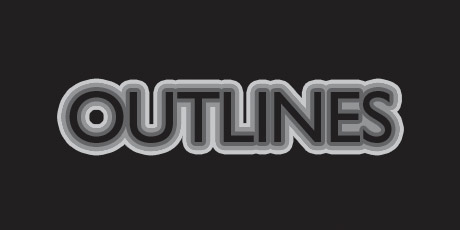
Final Result
Final Result
Alternative Look #1
Alternative Look #1
Alternative Look #2

By http://thedesignplaybook.wordpress.com

Friday, October 16, 2009

Transform Photo into Watercolor Painting


Preparation

There are plenty of great stock images to choose from Night Fate Stock of deviantArt. I’m using one of them for this tutorial.

Download Scenery image.

All rights of these resources belong to their respective owners.


Step 1 – Applying Smart Blur

Create a new document with size 750×550 pixels. Open up the Scenery image, drag into the document and resize it so it fits nicely. Rename this layer as Landscape.

Duplicate Landscape layer. Rename the new layer as Blur Landscape.

Go to Filter > Blur > Smart Blur. Set the Radius to 10 and Threshold to 30.


Step 2a – Applying Glowing Edges

Duplicate the Landscape layer again. Rename the new layer as Outlines. Drag the Outlines layer to be above Blur Landscape layer.

Go to Filter > Stylize > Glowing Edges. Set the Edge Width to 1, Edge Brightness to 12 and Smoothness to 15.

Go to Image > Adjustments > Invert. Then follow by Image > Adjustments > Desaturate.


Step 2b – Applying Glowing Edges

Set the Blend Mode of Outlines layer to Multiply.

Set the Opacity of this layer to 80.


Step 3 – Create Painting Layer

Duplicate the Blur Landscape layer. Rename this new layer as Painting.

Select the Painting layer and go to Image > Adjustments > Invert. Set the Blend Mode to Color Dodge.


Step 4 – Paint with Dry Brush

Set the foreground color to #000000.

Select the Brush tool and open up the presets. Choose Dry Brush. Set the Opacity of this brush to 10%.

Paint briefly over the Painting layer and you will get the effect shown on the left.


Step 5a – Applying Watercolor Effect

Select the Brush tool and open up the presets again. Click on the right pointing arrow and load Wet Media Brushes. Choose Watercolor Textured Surface Brush. Set the Opacity of this brush to 50%. Reduce the brush size to 15pt.

Zoom in and paint the water well on the Painting layer. Use short, random strokes that follow the shape of the water well.


Step 5b – Applying Watercolor Effect

Increase the size of the brush to 100pt.

Use long strokes this time for the sky. Gradually build up the depth of color by painting over certain areas more than once.

To give an impression of real watercolor, it will be good to leave small areas of white here and there.


Step 5c – Applying Watercolor Effect

Repeat the same method on Step 5b for the grasses.


Step 5d – Applying Watercolor Effect

Reduce the brush size to 30pt.

Same thing here, paint short vertical strokes of grasses on the Painting layer.


Step 6 – Apply Watercolor Filter

Duplicate the original Landscape layer. Rename this new layer as Details. Rearrange this Details layer to be the top-most layer.

Go to Filter > Artistics > Watercolor. Set the Brush Details to 12, Shadow Intensity to 0, Texture to 3.

Set the Blend Mode of this layer to Luminosity and Opacity to 25%.


Optional

And we’re done! Hope you enjoy this tutorial!

I enhanced the depth and colors of the painting further with a Levels Adjustment Layer. The settings are 9, 1.07, 203.

Click here to view the final image.


BY 10steps.sg

Draw a surreal dragon

In this tutorial I will show you how you can draw a surreal dragon. I will guide you step by step on how to draw a nice looking dragon. For this drawing one of our staff members “Andreea” worked a few days until she realized this effect. For this surreal drawing we have used a Wacom Cintiq tablet. Such designs you can realize only with a Wacom Tablet and a lot of patience

Preview full size image

I will start with a new document with the following size:

126

Then I will add a dark color over the document and with Brush Tool i will add some highlights. In that area i will create the sky.

220

I will create a new layer (press CTRL+SHIFT+ALT+N) and I will draw the sketch of the dragon. This step took me a few hours. First of all I have tried different combination on paper. I have scanned the image, and with my Graphic Tablet, I draw the dragon on my original document

319

I will create new layers and I will start drawing the scaly of this dragon

48

58

67

77

I will draw also some horns

87

Then I will add some scaly on the face of this dragon

97

I will create a new layer, and I will start drawing the background color of this dragon. On this layer I will change the opacity to 75 %, because I want to see the sketch

107

1112

I will duplicate the layer (press CTRL+J) and I will add some light and some shadow with Burn Tool and Dodge Tool

127

136

I will find an image with some rocks and I will add the rocks under my dragon

146

I will use one more time the Burn Tool, and Dodge Tool to create some lights and shadows

156

I will create another layer and I will add with Brush Tool a background. I will use a dark blue color.

166

I want to create some flames. I will start with drawing on a new layer with Brush Tool. I will use a thin white brush

177

Then with 2 different orange colors I will make another drawing. Do not forget to make it on a new layer

185

I will create another layer and with a big smooth brush I will add more details to the flames

195

On the dragon I will add the reflection of the fire

205

Now I will try to accentuate the sketch of the dragon. This time I will use the Burn Tool, and Dodge Tool to create some shadows and lights

2111

225

236

This is my result so far

244

With Dodge Tool and Burn Tool I will add some details over the scaly of this dragon

254

Now I will work on the dragon’s wings

264

I will add some thin lines with Burn Tool

274

The same thin lines I will add for the other wings

284

Behind the dragon I will draw some mountains

294

304

3110

You can see my result so far

325

I will accentuate the eyes. With a small brush I will add some red colors in the dragon’s eyes

333

Behind the dragon I will add a big moon. I will not add more details behind the dragon. If you want to play with layers please apply for a VIP subscription and you can add as many details as you want

343

Now I will add a filter because I want to accentuate the image a little. It is very good if you will select all the layers, and make a copy of all of layers. You can merge these layers into a single one by pressing on CTRL+E
I will select this layer, and I will go to Filter > Sharpen > Smart Sharpen

This is the image before applying the filter

354

These are the settings for the Smart Sharpen filter

362

And this is my result

372

This is my result so far.

Preview full size image

I can modify the levels (CTRL+L) and the look of my drawing will be changed

392

Preview full size image

402


Demo