Graphics Multimedia
Tuesday, July 19, 2011
Sunday, April 17, 2011
Tuesday, October 20, 2009
Photoshop Text Outline Effects

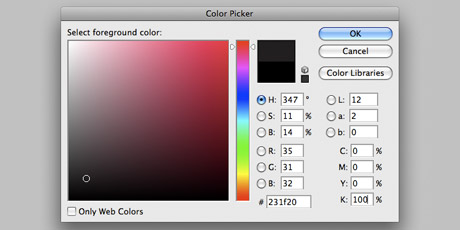
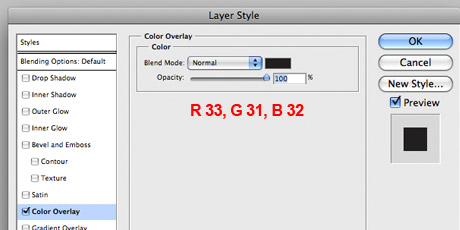
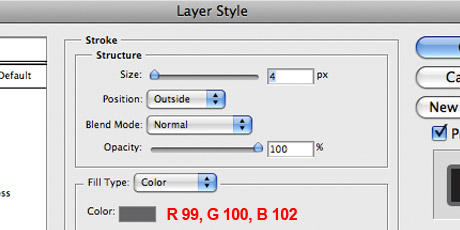
Need quick layer style that lets you apply multiple strokes (outlines) to a text or shape within Photoshop. Even though this is really simple in Illustrator via the Appearance Palette it’s not so straight forward in Photoshop (at least to my knowledge). This tutorial shows you how to hack a few of the built-in layer styles to add extra strokes outside of the actual stroke style.
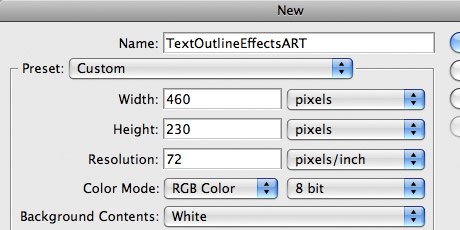
Step 1: Create a new Photoshop document.


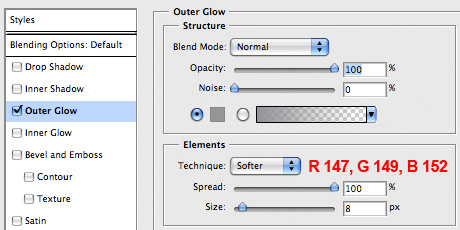

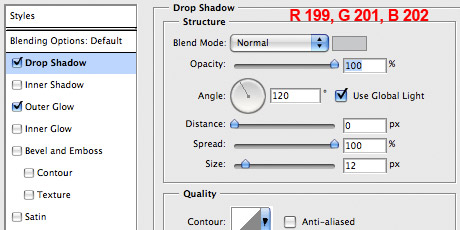
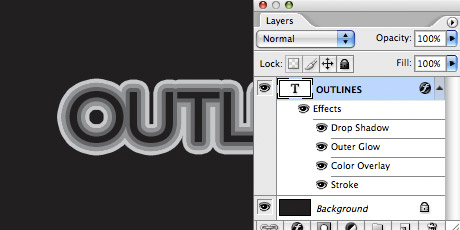


By http://thedesignplaybook.wordpress.com
Friday, October 16, 2009
Transform Photo into Watercolor Painting
 | Preparation There are plenty of great stock images to choose from Night Fate Stock of deviantArt. I’m using one of them for this tutorial. All rights of these resources belong to their respective owners. | ||
 | Step 1 – Applying Smart Blur Create a new document with size 750×550 pixels. Open up the Scenery image, drag into the document and resize it so it fits nicely. Rename this layer as Landscape. Duplicate Landscape layer. Rename the new layer as Blur Landscape. Go to Filter > Blur > Smart Blur. Set the Radius to 10 and Threshold to 30. | ||
 | Step 2a – Applying Glowing Edges Duplicate the Landscape layer again. Rename the new layer as Outlines. Drag the Outlines layer to be above Blur Landscape layer. Go to Filter > Stylize > Glowing Edges. Set the Edge Width to 1, Edge Brightness to 12 and Smoothness to 15. Go to Image > Adjustments > Invert. Then follow by Image > Adjustments > Desaturate. | ||
 | Step 2b – Applying Glowing Edges Set the Blend Mode of Outlines layer to Multiply. Set the Opacity of this layer to 80. | ||
 | Step 3 – Create Painting Layer Duplicate the Blur Landscape layer. Rename this new layer as Painting. Select the Painting layer and go to Image > Adjustments > Invert. Set the Blend Mode to Color Dodge. | ||
 | Step 4 – Paint with Dry Brush Set the foreground color to #000000. Select the Brush tool and open up the presets. Choose Dry Brush. Set the Opacity of this brush to 10%. Paint briefly over the Painting layer and you will get the effect shown on the left. | ||
 | Step 5a – Applying Watercolor Effect Select the Brush tool and open up the presets again. Click on the right pointing arrow and load Wet Media Brushes. Choose Watercolor Textured Surface Brush. Set the Opacity of this brush to 50%. Reduce the brush size to 15pt. Zoom in and paint the water well on the Painting layer. Use short, random strokes that follow the shape of the water well. | ||
 | Step 5b – Applying Watercolor Effect Increase the size of the brush to 100pt. Use long strokes this time for the sky. Gradually build up the depth of color by painting over certain areas more than once. To give an impression of real watercolor, it will be good to leave small areas of white here and there. | ||
 | Step 5c – Applying Watercolor Effect Repeat the same method on Step 5b for the grasses. | ||
 | Step 5d – Applying Watercolor Effect Reduce the brush size to 30pt. Same thing here, paint short vertical strokes of grasses on the Painting layer. | ||
 | Step 6 – Apply Watercolor Filter Duplicate the original Landscape layer. Rename this new layer as Details. Rearrange this Details layer to be the top-most layer. Go to Filter > Artistics > Watercolor. Set the Brush Details to 12, Shadow Intensity to 0, Texture to 3. Set the Blend Mode of this layer to Luminosity and Opacity to 25%. | ||
 |
|


